Art

Art

Wednesday, January 29, 2014

DIY Pearl Framed Mirror

What do you do when you have a bunch of pearl beads left over from a wedding?   Here's what I did.  First, I strung them into long threads of beads. Then I used a glue gun to attach the rows of beads around this thrift store mirror (after painting the frame white).  This looks so pretty in Jenna's room.


Like what you see?  Follow me on facebook by "liking" my facebook page, thanks for visiting.

Friday, January 24, 2014

My Secret Cupboard

This is by far one of my favorite projects to date.  I am so so happy with how this turned out!  This cupboard is so functional, and yet such a bit of decorating eye-candy. 

I wish I had "during" pictures to go with this post, but this was before my days of blogging.

So, here's my tiny bathroom.

And here's my solution to finding more storage for this bitty space.


I simply used the space between the 2 by 4's in the wall, to create this one of a kind medicine cabinet.  While we were building our home, I took pictures of all the walls (after the electrical work was done), so I would know if there were any wires back there.  Just in case of projects like these.

I cannot tell you how much I love having all these little cluttery items hidden away!  I also love how the painting is the perfect disguise for the cabinet.  Such a great alternative to the standard mirrored-pop-out-of-the-wall medicine cabinets.

Close up of the painting.
 I wanted to go with something neutral so when I redecorate,
this will always fit the color scheme.


Like what you see?  Follow me on facebook by "liking" my facebook page, thanks for visiting.

Tuesday, January 21, 2014

Diaper Cake Tips


You've all seen those adorable diaper cakes on pinterest.  Most all of them have one thing in common, individually rolled diapers.  To save a lot of time, use the "swirled diaper" technique. 

Place the diapers in a circle.  Then use your hand to help guide them into a swirled shape.  Use ribbon or tulle to cinch the diaper mass together.  I've found this way to be a lot quicker than rolling each individual diaper.  I also like the look of it as much or more than the rolled diapers.


Another great tip:  Use double-sided tape to stick the layers of "cake" together.  I used an extra wide tape that was meant for holding rugs in place. I also used double-sided tape to adhere the bear into a cuddly position on the cake, it added the perfect finishing touch!


Like what you see?  Follow me on facebook by "liking" my facebook page, thanks for visiting.

Gold Dipped Vases

Here's how I turned these cheap yard sale vases, into a beautiful gold dipped delight.

Here's what you'll need:  Masking tape, paint brush and brush on gold leaf.


Mask off the area you don't want to be painted.  Make sure to run your fingernail over the tape really well, to help prevent the tape from leaking under the tape.


Simply brush on the gold leaf (I used 2 coats) and enjoy.  I love these quick and easy projects, that make a big impact!


Like what you see?  Follow me on facebook by "liking" my facebook page, thanks for visiting.

Monday, January 20, 2014

LOVE Chalkboard

Remember these cute chalkboards I made over Christmas?  I used the same easy technique to make this one for Valentine's Day.  Works like a charm!  Click here for the full tutorial.


Here is my fun spray-painted birdcage, all decked out for Valentine's Day.  The amazing thing is, everything in this shot came from yard sales (for under $10)!


Like what you see?  Follow me on facebook by "liking" my facebook page, thanks for visiting.

Wednesday, January 15, 2014

Bio Sulfur Review

This post is a little different than usual, but I want to share.

For acne there are so many products out there.  I had tried one thing after another, to no avail.  Finally, when I got a little smarter, I started looking at the active ingredients.  All of the products were the same.  The active ingredient was one of two, benzoyl peroxide or salicylic acid.  Some of the products are super expensive, and still it's just the same ingredient.

Then I found this Grisi Bio Sulfur soap:


They sell this at Walmart (for me it was near the hair care section, not by the other soap).  You can also find it on amazon or Walmart online.  The other great thing is: it's only a few dollars per bar.  

I was excited to try something different, and for my oily and acne prone skin, this has been something great for me.  

Monday, January 13, 2014

Ombre Nail Art


Aren't these so fun?  Here's what you'll need:


Not pictured: Black nail polish, toothpicks and paper

First paint on the base coat you want.  I like light colors for the base.  I used a layer of white, and then lavender.


Use Vaseline to protect your skin from getting nail polish on it.  But take care not to get Vaseline on the painted nail.


Next, get a cup of water (at room temperature), and drop in one drop of nail polish (I like to use a darker color for this part).


 The drop will spread, as pictured below.  Dip your nail (one at a time) straight into the area of the color that you want on the nail.  I focus on getting a more concentrated amount of color on the tip of the nail, and having the color fade towards the bottom (it does take practice, you WILL NOT get it right the first time).  This creates the ombre effect.  While your nail is still in the water, use a toothpick to remove the remaining film that is floating on the surface of the water.  Then take out your finger.


Here's what your hand will look like after they have all been dipped.  Remove the colored Vaseline using a paper as a rag (because it's lint free).


After getting everything cleaned up, here's what it looked like.


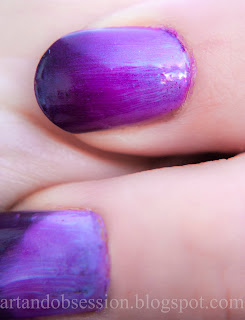
I wanted more contrast, so I went over them again, using the same technique, but this time I used a drop of black.  This gave me just the look I was going for.  Finish with a top coat of clear.

I sure wish I could preserve these bad boys.  With all the painting projects I want to do, these won't last long.


I'm not going to lie. This whole process can be tricky.  Don't be discouraged if you don't get it right the first time.  Practice practice practice.  It's a good idea to have some help from a friend too, an extra hand can go a long way.

There are so many possibilities with this technique!  There are so many combinations I want to try out.  Here is the "water-marbled" version.  I learned by watching some great tutorials on you tube (there are a lot out there).

These were my "cruise nails" from a couple years ago.  Sigh...  I miss summer.


Here is a pink marbled nail, perfect for Valentine's Day!


Like what you see?  Follow me on facebook by "liking" my facebook page, thanks for visiting.

Tuesday, January 7, 2014

Dollar Store Memory Book


Here's how I made these cheap and simple memory books for Jenna and Adam's baptisms.

Start with a trip to the dollar store, and pick up one of these 4 by 6 photo books.  Take out the cover and  replace it with your own.


I prepared 4 by 6 cards to pass around.  People could write a note to the child on their special day.


Here's how they turned out.  Inside I placed the notes, a copy of the program, a note to themselves, cards they received and pictures from the day.


This special little memory book would be nice to have for all sorts of special occasions.


Like what you see?  Follow me on facebook by "liking" my facebook page, thanks for visiting.

Monday, January 6, 2014

Little Girl Headbands

Remember these adorable headbands I made for Lily's newborn photos?  My sister (who is pregnant with twins) was over for the weekend and we decided to make some more. 


First we went to the thrift store and found a bunch of cute fabric scraps (in the form of old baby clothes), and used the scraps to make these fabric flowers.  There is no rhyme or reason to the madness.  We just armed ourselves with a little pintrest, a glue gun and creativity.


Here's some of what we turned out:


This was a perfect activity for a sisters night out!

Like what you see?  Follow me on facebook by "liking" my facebook page, thanks for visiting.